
Monday, October 29, 2012
One year ago...
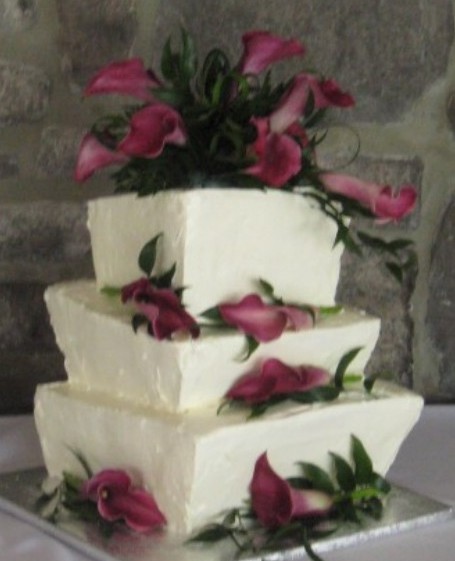
Saturday, October 27, 2012
Witch Hats

Chocolate
Witches’ Hats
- 1 1/2 c all-purpose flour, plus more for work surface
- 1/4 c unsweetened cocoa powder
- 1/4 tsp ground cloves
- 1/4 tsp salt
- 1/2 tsp baking soda
- 6 T unsalted butter, softened
- 1/3 c packed dark-brown sugar
- 1 large egg
- 1/4 c molasses
- 12 sugar ice cream cones
- M&M's or other small candy
- 12-15 oz melted chocolate (used chocolate dipping wafers, Hershey bars, or chocolate chips)
- Twizzler Pull –n- peels, or other long, thin candy
In a medium bowl, whisk together flour, cocoa powder,
cloves, salt, and baking soda.
Place butter and brown sugar in the bowl of an electric
mixer fitted with the paddle attachment; mix on medium speed until pale and
fluffy, about 4 minutes. Add egg and molasses; mix until combined. Reduce speed
to low. Add flour mixture; mix until just combined. Halve dough; shape into
disks. Wrap each disk in plastic; refrigerate until cold, about 1 hour.
Preheat oven to 325 degrees. Working with 1 disk at a time,
roll out dough on a lightly floured surface to 1/4-inch thick. (If dough
becomes too soft at any time, freeze until firm.) Cut dough into 12 circles
using a 3 1/2-inch round cutter; space 1 inch apart on baking sheets lined with
a nonstick baking mat or parchment paper. Refrigerate until firm, about 20
minutes.
Bake, rotating sheets halfway through, until firm, 11 to 13
minutes. Cool on sheets on wire racks.
Line a baking sheet with parchment. Using a pastry brush, paint a thick layer of
melted chocolate on the top of one cookie. Fill one cone with M&M's and press the cookie gently on the cone. Invert carefully and repeat the process with
remaining cookies and cones. Chill for 10 minutes to set. Remove from
refrigerator and paint entire surface of hats (cones and cookies) with
chocolate. Chill until set, about 20 minutes, then tie candy belts around the
base of each hat.
Wednesday, June 20, 2012
Swiss Meringue Buttercream
 This is Martha Stewart's Swiss Meringue Buttercream recipe. It makes a beautifully glossy and smooth frosting that isn't too sweet. I also like that the egg whites are heated, unlike French buttercream recipes that use uncooked egg whites. The recipe isn't hard, but you do have to follow the directions carefully, or you'll end up with a clumpy mess. I know because I've ended up with a clumpy mess! The recipe makes A LOT of frosting, so feel free to halve, or just throw the extra in the fridge or freezer. You'll need to beat it again before you use it.
I used this recipe for all the cakes in the photos. Although the buttercream is very creamy and seems like it would melt in the slightest heat, if made correctly it actually holds up really well.

Whip meringue: Attach the bowl to a standing electric mixer fitted with the whisk attachment, and beat on low speed until foamy. Add cream of tartar, and beat on medium-high speed until stiff, glossy peaks form and mixture is cooled completely, about 10 minutes. Feel the bottom of the bowl to make sure it isn't warm.
Mix in butter: Reduce speed to medium-low; add butter 2 tablespoons at a time, beating to incorporate fully after each addition. Don't worry if the buttercream appears curdled at this point; it will become perfectly smooth again with continued beating. Keep the mixer at a low speed - high speeds will create a clumpy texture. After all the butter has been incorporated, beat in vanilla.
Finish: Switch to the paddle attachment. Beat on the lowest speed to reduce air bubbles, 3 to 5 minutes. Let stand, covered with plastic wrap, at room temperature.

Swiss Meringue Buttercream
- 1 1/2 cups sugar
- 6 large egg whites
- Pinch of salt
- 1/4 teaspoon cream of tartar
- 2 cups (4 sticks) unsalted butter, cut into tablespoons, room temperature
- 1 teaspoon pure vanilla extract
Whip meringue: Attach the bowl to a standing electric mixer fitted with the whisk attachment, and beat on low speed until foamy. Add cream of tartar, and beat on medium-high speed until stiff, glossy peaks form and mixture is cooled completely, about 10 minutes. Feel the bottom of the bowl to make sure it isn't warm.
Mix in butter: Reduce speed to medium-low; add butter 2 tablespoons at a time, beating to incorporate fully after each addition. Don't worry if the buttercream appears curdled at this point; it will become perfectly smooth again with continued beating. Keep the mixer at a low speed - high speeds will create a clumpy texture. After all the butter has been incorporated, beat in vanilla.
Finish: Switch to the paddle attachment. Beat on the lowest speed to reduce air bubbles, 3 to 5 minutes. Let stand, covered with plastic wrap, at room temperature.
Monday, June 18, 2012
Crafts & Cakes


Very busy weekend with my brother and nephew visiting from Utah, along with my brother's girlfriend and her son. The boys are 5 and 6 and we celebrated their birthdays on Sunday. I got some inspiration from Cassie at Primitive & Proper and made picture book page frames for them. I'll have to make one for Bella next. I used a plastic 4x6 sleeve to put the picture in. I had to cut a tiny corner off each side of the top to get it to fit in the frame, but it worked out perfectly.

To continue my crafty weekend, I stopped by Stylish Patina's new barn sale and picked up a few things. Not sure where I'll put my new cast iron bird rack, but for 10 bucks I couldn't resist!
 On to the recipes! I made a cake and cupcakes for the party. Classic white cupcakes with my favorite Swiss meringue buttercream frosting for the kids and peanut butter chocolate cake for the grownups. I made the cupcake into rainbows, and of course added sprinkles. The chocolate cake I made gluten free just for Mom, but here's a link to the original recipe on Sassy Radish. Be warned: this cake is over the top. Definitely a special occasion kind of thing, especially if the guest of honor is a peanut butter-chocolate lover. You can use any chocolate cake recipe you want in place of the sour cream cake as long as it's sturdy enough to handle the massive amount of peanut butter frosting. There will be an upcoming post with the cupcake recipe, but in the meantime, you'll have to just drool over the pics...
Thursday, May 31, 2012
Blueberry Pancakes
 Bella harvested the first of the blueberries last night. We were picking up branches from the storm last weekend and noticed the berries were ripe as we hauled the brush to the woods. The raspberries are not far behind. I've got lots more cleaning up to do this weekend since we were away for Memorial Day. We spent a night at an amazing bed and breakfast, the Bella Vista in Akron. French Toast for breakfast, my favorite! The next day we drove over to Hershey and spent the morning at Hershey Gardens, and the afternoon at Chocolate World. (There is a recipe in here somewhere, I promise.) All this week Bella has been walking around, saying, quite dramatically, "I miss Chocolate World."
Anyway, the blueberries... I always try to complicate pancakes, adding sour cream, or yogurt, or trying to make some ridiculous recipe that calls for whipping the eggs whites (who wants to whip egg whites first thing in the morning?) without actually whipping them. They (the pancakes, not the eggs) end up heavy and undercooked, and the last time I made blueberry pancakes Bella wouldn't even eat them. So when a Cook's Illustrated basic pancake recipe landed in a my inbox a few weeks ago, I printed it out. Simpler is better for lots of things, and especially pancakes.
These turned out perfectly. I added the blueberries to each pancake as I poured the batter. I think that works better than stirring them into the batter since they don't break up so much. Of course we had extra, so they are in the freezer right now. I'll pop them into a ziploc bag in a few hours and have toaster pancakes for next week.
Classic Pancakes

Whisk the flour, sugar, baking powder, baking soda, and salt together in a large bowl. In a medium bowl, whisk the buttermilk, melted butter, and egg together. Make a well in the center of the flour mixture, pour the buttermilk mixture into the well, and gently whisk together until just incorporated with a few lumps remaining (do not overmix).
Heat a 12-inch nonstick skillet or griddle pan over medium heat for 3 to 5 minutes. Brush the pan bottom with a thin layer of the oil. Using ¼ cup of batter per pancake, add the batter to the skillet and drop three or four blueberries on each pancake. Cook until large bubbles begin to appear, about 2 minutes. Flip the pancakes and continue to cook until golden brown, about 1½ minutes. Transfer the pancakes to plates, or keep warm on a wire rack in the oven. Repeat with the remaining batter, brushing the skillet with oil as needed.
If you have leftovers, put them in the freezer on a wire rack, and when they're completely frozen, transfer to a ziploc bag. Pop them in a toaster for a quick breakfast.
Saturday, May 12, 2012
Fake Cake Pops for Mom
 Made these today in my Daddy and Me class for Mother's Day.
 Slice a pound cake into 1" thick slices and cut into shapes with mini cookie cutters. Slide each one into a lollipop stick and place on a wire rack set in a cookie sheet.
In a medium saucepan, mix 9 c powdered sugar, 1/2 c corn syrup, 1 tsp vanilla, and 1/2 c water. Stir over medium heat until smooth. Let sit for 5 minutes, then divide into bowls and color as desired. Pour ever icing over the pound cake shapes, decorate, and let dry for 20-30 minutes. If the icing starts to harden, reheat in the microwave for 15 seconds.
Saturday, March 24, 2012
Easter Cream Wafers

These little sandwich cookies were always my favorite thing about Easter. Bella found the cookie cutters in spring shapes - aren't they just the cutest?!
The cookies are quite delicate, so make sure they're completely cool before frosting.I used a basic butter frosting. Divide into four bowls and color in pastels.
Cream Wafers
- 1 c butter, softened
- 1/3 c whipping cream
- 2 c flour
- Granulated sugar
Heat oven to 375°.
Roll about 1/3 of dough at a time to 1/8" thick. Keep remaining dough chilled. Cut into 1 1/2 inch rounds or shapes. Pour granulated sugar into a shallow dish, and coat both side of each cookie with sugar. Place on ungreased cookie sheet. Prick with fork.
Bake 7 - 9 minutes or just until set, but not brown. Cool, then frost with colored icing to make sandwiches.
Subscribe to:
Posts (Atom)